Table of Contents
To use the SDK in a project, the code from the SDK must be included in that project. The easiest way to do this is to link to static libraries. The SDK comes with build scripts to build static libraries for common environments.
Prerequisites
Building SDK code out of the box requires a number of tools. This section lists the tools used to build the SDK.
| Prerequisite | Notes |
|---|---|
| A C/C++ compiler | Core code in C. Unit tests need C++11 support. |
| Python | Validated with v2.7.10 |
| SCons | Validated with v2.4.1 |
| Parts | 0.10.9.2 or later |
Building
To use the SDK, you need to build it to generate libraries compatible with your build environment.
To build based on the default SConstruct file in the root directory of the SDK, invoke scons with no arguments.
cd <path/to/sdk-root>
scons
By default, this performs a 64 bit release build.
Potentially useful command line options:
| Option | Action |
|---|---|
--cfg=debug | Build in debug mode |
--cfg=release | Build in release mode |
--target=x86 | Target x86 |
--target=x86_64 | Target x86_64 |
--tc=cl | Use msvc to compile |
--tc=gcc | Use gcc to compile |
--tc=icl,mstools | Use intelc to compile |
build:: | Build the SDK (does not build unit tests) |
utest:: | Build unit tests |
run_utest:: | Run unit tests (builds tests if needed) |
-c | Clean the build |
Built components appear in the _install directory of the SDK root.
Example Programs
The SDK includes several examples that show you different aspects of how the Intel® EPID scheme works. In the SDK build, these examples are located in _install/epid-sdk/example.
| Name | Description |
|---|---|
signmsg | Create Intel® EPID signature of message |
verifysig | Verify signature is from a group member in good standing |
Building with Other Build Systems
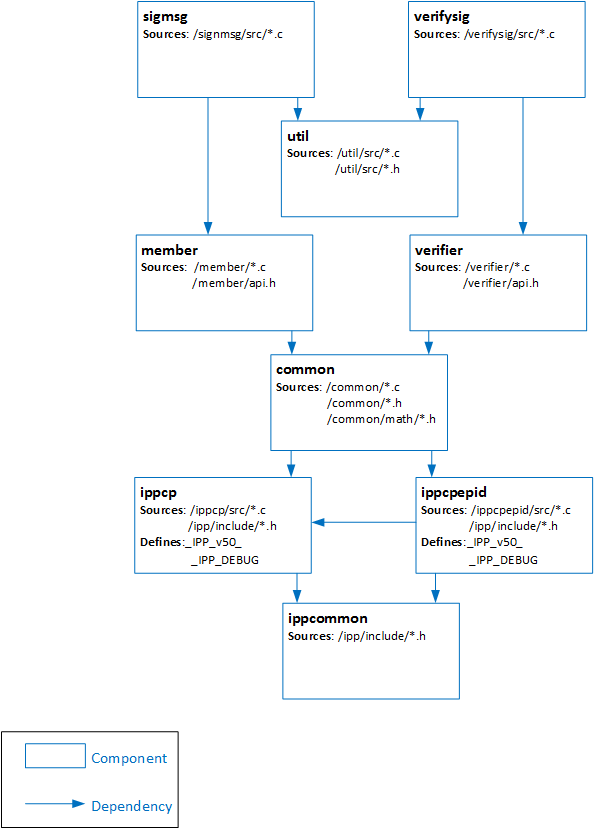
It is relatively straightforward to port the SDK to your build system of choice. The following dependency diagram shows the relationship between components and the sources used to build them.
